
|
Fetch has been around for a long time. It is the brainchild of Jim Matthews of Dartmouth College, and is available as freeware to students and educators ($25 shareware fee to commercial users). You can get a copy of the latest version at http://www.download.com/.
Once you have downloaded the binhexed (.hqx) Fetch installer from download.com and decompressed it (this should happen automatically in Netscape Communicator), you can install Fetch by double-clicking the Fetch Installer.
Before you can launch Fetch, you'll need information which only your Internet Service Provider (ISP) can provide: namely, the name of the FTP server that you will need to log into, your login name (which is usually the same one you already use to log into your ISP), and password (again, this is usually the same one you already use to log into your ISP).
The FTP server for an ISP is usually just named the same thing as the ISP except for the prefix "ftp" attached with a dot (.) to the front of the name. For instance, my ISP is "monitor.net", and their FTP server is called "ftp.monitor.net".
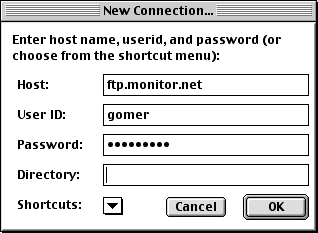
For this example, we'll say that our FTP server is called ftp.monitor.net, that our login name is "gomer", and that our password is "pipsqueak" (note: although the FTP server name is real, the login name and password are completely fictitious).
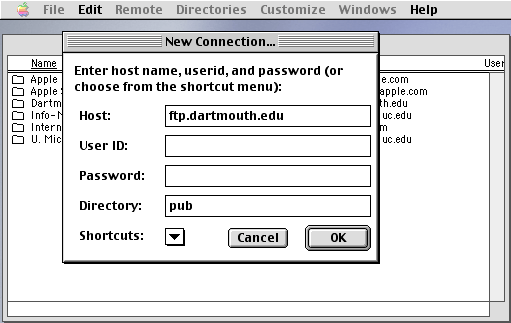
Launch Fetch. You should see a default login screen like this:
You'll need to type in your correct server and login information. The "Host", in our example, will be "ftp.monitor.net". The "User ID" and "Password" will be "gomer" and "pipsqueak" respectively, as mentioned above (remember, this is an IMAGINARY login and password used for this example only). The "Directory", in this case, will be left blank (your ISP may or may not require something here; this indicates a pathname on the server to a particular directory). Here's how this would look:
We'll click OK to log into the server. Later, I'll show you how to make a shortcut. A shortcut allows you to save all of this login information; when you come to this screen in future, you will be able to choose a shortcut from the "Shortcut" pulldown menu which will keep you from having to fill everything out each time you open Fetch.
Once you've logged into the server, you'll come to Fetch's main screen:
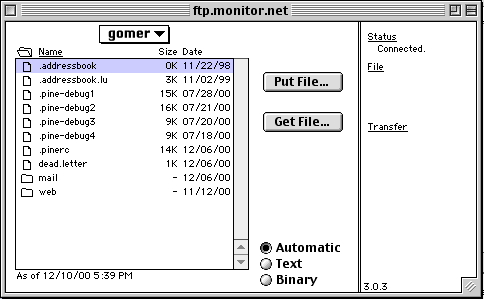
Gomer, in this example, has two folders on his server (along with other files), "web" and "mail". The "web" folder is the root directory of Gomer's web domain. Gomer can get into his "web" folder by double-clicking on the folder icon. In Fetch, you can always double-click on a folder icon to move into that particular folder. Once inside a folder, you may upload files to that folder, or download files from that folder.
Before we can start transferring files in Fetch, however, we need to set a couple of Preferences. As far as Fetch (and most FTP programs) are concerned, there are just two file types: 1) ASCII (plain text), and 2) everything else (raw data binary files, which include all sounds, images, animations, movies, etc). You must preset how raw data binary files are to be transferred in Fetch; the default setting is to compress these files in MacBinary format with a ".bin" extension, which is incorrect for your GIFs, JPEGs, AIFF files, SWF files, and other http-delivered files. You have to reset the data type for transfer of raw data binary files to "Raw Data".
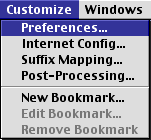
To access the Preferences for Fetch, choose the "Preferences..." selection of the "Customize" menu, as shown in the following illustration:
You will then see the "Preferences" screen. Click the "Upload" tab. Make sure that "Default text format:" is set to "Text". You must set the "Default non-text format:" pulldown to "Raw Data", as shown in the following illustration:
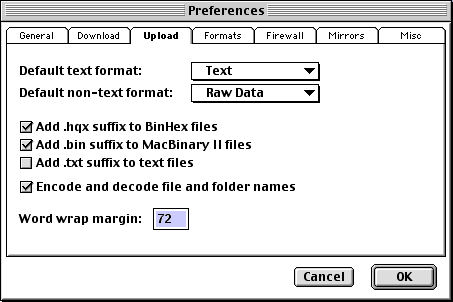
I believe the remainder of the preferences shown in the above illustration are the default settings. Click OK.
Now, you're ready to upload and download files and folders!
Uploading files and folders into any folder on your site is quite easy. By double-clicking on folders in the main scrollbox of Fetch's main screen, get yourself into the "web" folder, or whichever folder you want on your site. Then, in the Macintosh Finder, find the file or folder that you want to upload. Click-and-drag that file or folder to the main scrollbox for Fetch (which should be displaying the contents of your desired destination folder). That's it! Fetch will automatically upload onto your site whatever you've dragged into Fetch's main scrollbox in the main screen.
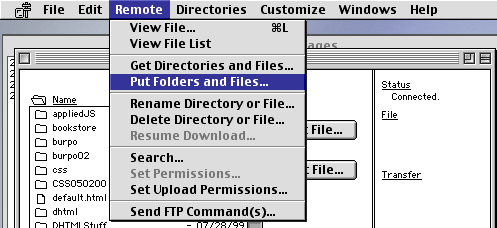
There is a second way to upload files and folders. If you just have one file, you can click the "Put File..." button on Fetch's main screen. If you have several files or a folder or several folders that you want to upload, you can choose the "Put Folders and Files..." option from the "Remote" menu, as shown in the following illustration:
This brings up a browsing screen, which allows you to choose the files and folders that you want from the top scrollbox, as seen in this illustration:
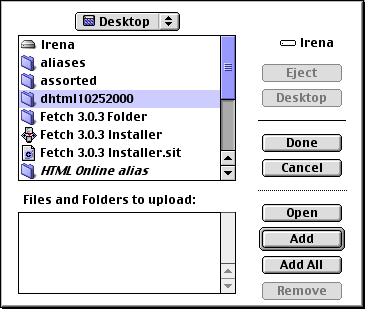
Once you've selected a file or folder in the top scrollbox, you can click the "Add" button, as evidenced in this illustration:
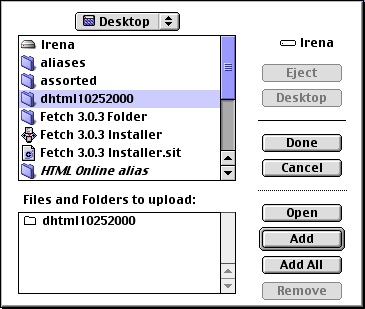
You may "Add" as many choices as you like. Once you've added everything that you want, you click the "Done" button, and Fetch starts the upload process.
In Fetch, if you get too far down into sub-folders, you can always get yourself out again by utilizing the pulldown menu above the main scrollbox in the main screen. Here is a set of before and after pictures, showing you the pulldown menu in action:
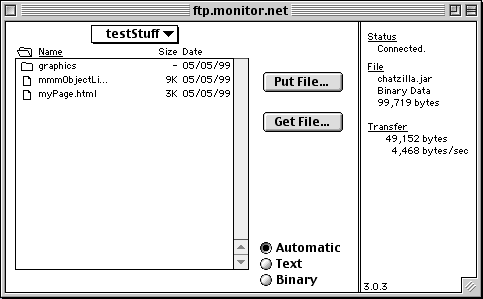

As you can see from the second illustration, I can access any folder along the path of my FTP server by selecting one of the choices in the pulldown menu. In the above example, I am in the "testStuff" sub-folder of the "web" folder inside of the "gomer" main folder, etc.
Again, on most ISPs, the main root directory for a website will be named "web". Nothing outside of "web" will be visible on the Web, and the "/" relative URL prefix on a link within "web" leads TO the "web" folder, not outside of it.
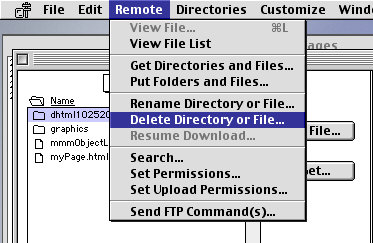
To delete files or folders, simply select the file or folder from the main scrollbox of the main screen that you wish to delete, and choose the "Delete Directory or File..." option from the "Remote" menu, as seen in the following illustration:
To download stuff from your FTP server, you can just drag-and-drop files or folders from the main scrollbox on Fetch's main screen TO your hard drive or desktop or Zip disk or whatever, and Fetch will download whatever you've draggged. You can also choose the "Get..." button on the main screen once you've selected a single file, or the "Get Directories and Files..." option from the "Remote" menu for folders or multiple files.
Earlier, we talked about creating a new Shortcut for the opening login screen. Choose the "New Bookmark..." or "New Shortcut..." option from the "Customize" menu, as in the following illustration:
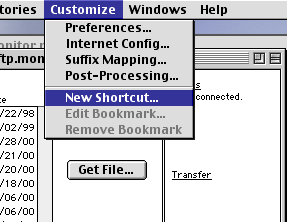
Note: I think there's a bug in the program, because sometimes the above menu item says "New Bookmark..." and sometimes it says "New Shortcut...".
Once you've gotten the Bookmark Editor window, you can create your new shortcut, as in the following illustration:
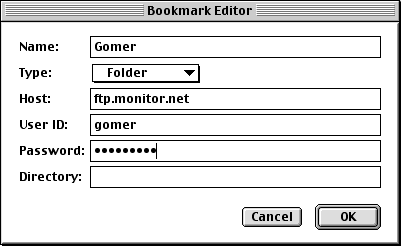
Remember that the "Name" entry is what you'll be seeing as the entry in the Shortcuts pulldown menu on the opening login screen. The rest of the information above is just what you'd type into the login screen, the password being optional (you may not want to set the password in the shortcut for security reasons).
We have now covered Fetch's most important features for getting you up and uploading. Obviously, Fetch has many other capabilities, which you may explore on your own. Good luck!
Copyright © 2001 Michael Masumoto. All Rights Reserved.